Introduction: Uses of forms
Forms are used on web pages to collect data from users and send them to the website server, for
example -
- contact details and enquiries to the site owners
- username and password for site login
- keywords to search a website
- order and payment details for online applications such as e-commerce sites
- answering questions on an online survey
- to upload user-generated content to a social media site such as Facebook or Instagram
Forms are therefore a vital component of any interactive website or
web application. Without forms, using a website is a one-way process. Today you are going to learn
how to create an HTML5 form, including the interactive input elements; basic HTML5 form validation; and how to
style forms. We are not going to consider how the data that the user enters in
the form is sent to the web server, or how form functionality can be enhanced with JavaScript - that will come
next semester when you will learn how to build interactive web pages.
Forms need to be made in two stages - first, create the form in the HTML document, using form
elements; second, style the markup with CSS.
This tutorial will cover the following form elements -
<form><fieldset><legend><label><input> types - text, radio, submit <textarea><button>
There are more HTML form elements, input types and form widgets in HTML5 (not all of which can be used
without a fallback, because of lack of browser support). For a list of form elements and information about HTML5 forms
refer to these websites -
STEP 1: Insert a form on the web page
The first step is to insert a form on a third Contact page of your website: linked to the Home and Tutorial pages.
Create a <form> element on the
Contact page. This should go beneath the navigation and before the footer -
<form  id="form1">
</form>
It's important to give the form an id attribute,
as these values are targeted by script files to make the form interactive. You won't be able to see
the form yet when you view the page in a browser, as it doesn't contain any elements or content.
N.B. There is no need to put a <form> element inside a <div> (a common mistake).
STEP 2: Add form elements to the contact form
We are going to put the following objects on the form:
- Text type input fields - for entering text in boxes such as name and
address details and comments
- Labels - the explanatory text that the user will see on the form next to the form feature
- A set of radio buttons - where only one answer can be selected from a list
of options
- A fieldset and legend - a box and a caption for different parts of the
form
- Different types of button - to send the data on the form to the web
server
With so many elements, including the form element itself, forms have a lot of potential for CSS styling.
The text type of input element and label element
Text fields are used to enter data into a form: these are input elements, with
the attribute type="text". The <label>
element is used to create a text label on the form describing the data the user has to enter into the
text field.
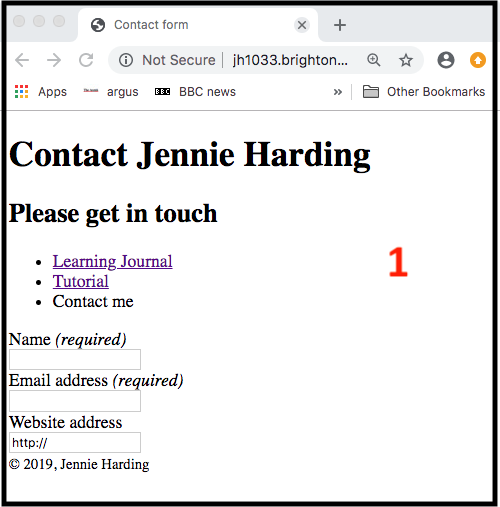
Add the following HTML to your contact form to create three text boxes, for the user to enter their
name, their email and the URL of their website (if they have one). <input> and <label> are inline elements - so add a declaration to your stylesheet to style them as block elements.
HTML
<form id="form1">
<label for="name">Name <em>(required)</em></label>
<input type="text" id="name">
<label for="email">Email address <em>(required)</em></label>
<input type="text"  id="email">
<label for="url">Website address</label>
<input type="text" id="url" value="http://" >
</form>
CSS
label {display: block;}
input {display: block;}
Note the following things about these lines of code -
- The
<label> element for a text field is associated
with it by using the "for" attribute with the same value as
the "id" attribute of the <input>
element.
- The text fields that the user must complete have been labelled (required) -
<em>(required)</em>
- The text input element for the URL has a "value" attribute with
the text
"http://" - this text shows in the text field when
viewed in the browser, giving the user a cue about how to complete this text field on the form
Save the page and check it in the browser: it will look like the form in screenshot 1.
Go to top of page
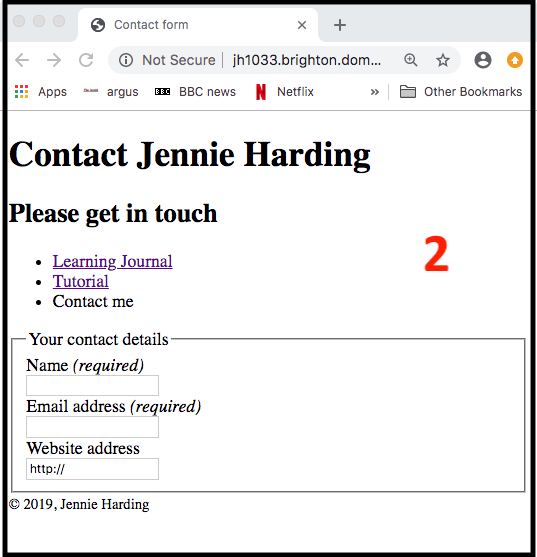
The fieldset and legend elements
The <fieldset> element is used to create a container or box
that groups associated form elements together in a set. The <legend>
element is used to create a caption or title for the fieldset. Form elements should be nested within
the fieldset tags <fieldset>; the
<legend> tag should follow the <fieldset> tag -
<div id="form">
<form id="form1">
<fieldset>
<legend>Your contact details</legend>
<label for="name">Name <em>(required)</em></label>
<input type="text" id="name" >
....
</fieldset>
When viewed in the browser the form will look like Screenshot 2.
Go to top of page
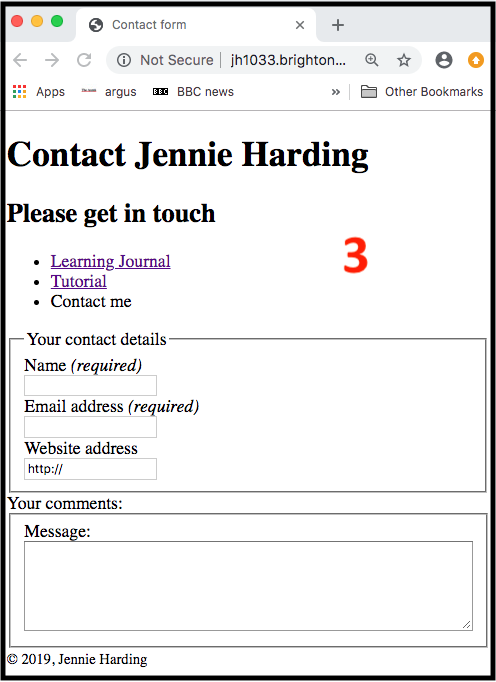
The textarea element
The next step is to create text box for comments - with enough space for several lines of text.
To do this use the <textarea> element.
<fieldset>
  <label for="message">Message: </label>
  <textarea id="message" required></textarea>
</fieldset>
When viewed in the browser the form will look like Screenshot 3.
Style the form in CSS and specify the required width for the textarea in % or em.
Go to top of page
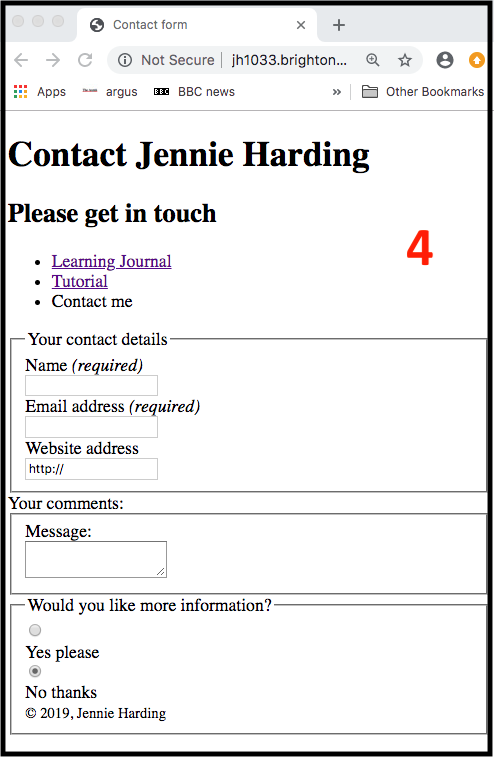
Radio input type
A Radio Group consists of two or more buttons; users can choose only one of the
options. Radio buttons are input elements with the type attribute
"radio". The buttons must be associated in a group with the same value for
the name attribute in order to work as required. Add the following code to
your form -
<fieldset>
<legend>Would you like more information?</legend>
<label for="information-yes">
  <input type="radio" id="information-yes"
  name="information" value="yes">Yes please</label>
<label for="information-no">
  <input type="radio" id="information-no"
  name="information" value="no" checked >No thanks</label>
</fieldset>
I have used the Boolean attribute checked (which doesn't need a value) for the 'No thanks' option. When viewed in the browser this option will be displayed as pre-selected - see Screenshot 4.
Go to top of page
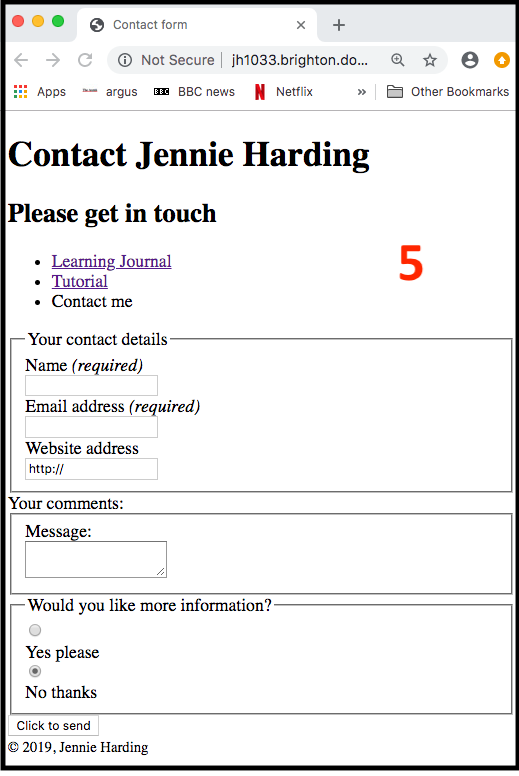
Submit input element
The final input element to put on the form is a button for the user to submit their data to
the website.
The button can have two possible actions - Submit form or Reset
form, to clear the data (see Screenshot 5), or no action.
Add the following code to your form -
<input type="submit" value="Click to send" >
Step 3: Enhancing forms with HTML5 form input types and other features
HTML5 has 13 new form input element types; these are all associated with their own controls. For a full list read this very good article in HTML5 Doctor - http://html5doctor.com/html5-forms-input-types/.
Browser support for HTML5 forms is best in Chrome; still partial in Firefox and Internet Explorer 11. This is not a reason for not using the new input types: the fallback when there is no browser support is for users to see a plain text box - OK for entering data. For up to date information on browser support for HTML5 form input types check http://caniuse.com/#feat=forms
Open Chrome for testing and experiment with the following input types -
<input id="date" type="date">
<input id="color" type="color">
<input id="number" type="number" min=0 max=100 step=5 >
There is also a range input type, with a slider control; use the <output> element to display the value of the slider as it changes -
<input id="range" type="range" min="0" max="100" value="0">
<output for="range">0</output>/100
View my form in Chrome to see examples of the HTML5 input types - example contact form
Step 5: Form CSS styling example
Forms have a large number of elements and this provides good scope for styling. Browsers render
the some form elements differently - making cross-browser testing essential.
I've added a stylesheet to my form to style and layout the elements. The radio and submit input types have been targetted using the following selectors, in order to style them differently -
input[type="radio"] {}
input[type="submit"] {}
The appearance of some of the input widgets - such radio buttons, check boxes, submit - is often controlled by the browser, but it is possible to change the browser default style using CSS3. Take a look at these online tutorials -
Here's the example form I made, including the HTML5 form features.
If you have not had time to complete the tutorial please carry on and finish it in your own time.
If you have any questions email Jennie Harding.