In this module you will learn how to make responsive, standards-compliant web pages using HTML and CSS. Those of you who already have experience in web design and development may not have too much to learn at first. That's fine - you are welcome to work through these tutorials as quickly as you like, but please check to see if there is anything new, or different from how you have been taught before. Those of you who have little experience, or are complete novices, need not worry - the lab tutorials do not assume any prior knowledge of web development.
The first thing to decide is what tools you will be using to hand code your web pages. You are free to use whatever tool you find easiest, or have previous experience of using. There are three code editors in the labs, which you can find through the Applications shortcuts folder on your desktop -
Notepad++ is a usable open source code editor - but it won't provide much support with authoring HTML and CSS. It can be downloaded free from this link http://notepad-plus-plus.org/. If you use Notepad++ you will need to look up the HTML5 elements - MDN HTML element reference is an excellent resource.
Brackets is an Adobe open source code editor that makes it easy to design in the browser and which is integrated with other Adobe software such as Photoshop. It can be downloaded free from this link - http://brackets.io/
VSCode is a free, open source, multi-platform and simply the most popular code editor among developers right now, available here: VSCode. Also has many useful plugins like a development server to see live changes on web pages, automatic code formatting and many others. Please note: this is a standalone editor, not the full Visual Studio development environment.
Dreamweaver CC20XX (Adobe Creative Cloud) is a full-featured web development software for developing and publishing websites. If you do use Dreamweaver, please write HTML in the Code editor or Split view, rather than creating your site in the Design view, as this is the best way of learning. We do not recommend this option, as it is not a good way to develop coding skills.
The purpose of this tutorial is to show you how to manage site files; and to set up the 3 basic pages for the assessed coursework. Don't attempt to style the pages yet – just structure text content and links to build a skeleton website. It's best practice to start with HTML to structure the content, test and ensure that it is valid and well-formed, before starting to work on the presentation.
STEP 1: Create a site folder and the Learning Journal page index.html
It's important to manage website files properly. Even a small site will consist of linked HTML documents, one or more linked CSS stylesheets, and several image files. All these files should be organised in a root directory (folder) with sub-folders: if files are moved or renamed links will be broken and you will have to re-create them. When you submit your coursework at the end of this semester you will zip up your website folder and all the files it contains - so it's important to be organised from the start.
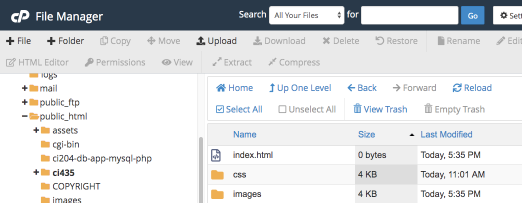
Open your Brighton Domains workspace that you used in the induction class. Make sure that you are in your public_html folder.
Make a new folder in your Brighton Domains workspace in which to store your site files. Give it a name – this should be a simple, one-word name that identifies your website; it will form part of the site URL.
This name should be ALPHANUMERIC (i.e. letters and/or numbers) have NO SPACES and NO CAPITAL LETTERS. In the instructions which follow I will refer to this site folder as 'ci435'.
Within that folder make another new folder and call it 'images'. This is where you will store the images that you will put on your website.
Make a second folder and call it 'css'. This is where you will store the stylesheets that will control how your page is presented.
Create a new text document (go back to Induction to remind yourself how to do this - you might want to work directly in Brighton Domains or work offline and upload later). Rename the file 'index.html'.
index.html is the entry page to your website and your Learning Journal.
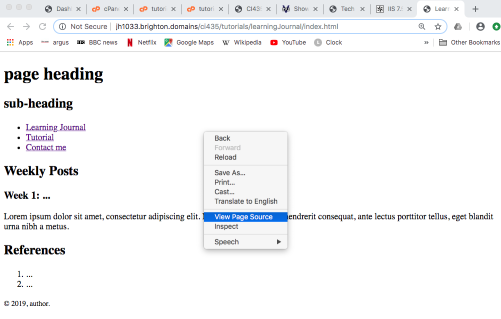
Open this link in a new browser tab - Learning Journal template. You will see a basic HTML web page with the Learning Journal structure.
Right click on the template and click View Page Source to see the source code for the template -
Copy the source code, Paste it into your own index.html file and Save it.
You have now made the first page for your website. It's on a web server - a computer which receive requests from agents such as browsers and responds by sending the files that make up a web page. Open up a web browser (Chrome or Firefox are recommended for web development) and put in the following URL -
STEP 2: Create a second HTML page - tutorial.html - and link it to index.html
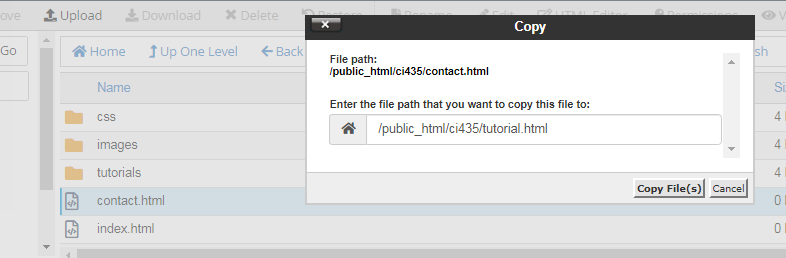
[On local computer] Choose File>Save As to save a copy of index.html in your site folder and name the new file 'tutorial.html'.
[On Brighton Domains] Right click on your existing file an choose Copy to make a new copy of index.html in your site folder. You will see the dialog box below, and will need to type in '/tutorial.html'..
The syntax that is used in the template follows the rules of XHTML 1.0 Strict (an earlier version of HTML). The syntax rules are -
Elements must be correctly nestede.g.<p>Elements must be <strong>correctly nested</strong></p>
Elements must always be closede.g.<title>Learning Journal</title>
Elements must be written in lowercasee.g.<p>, <h1>, <article>
Attribute names must be in lower casee.g.<header class="title">
Attribute values must be quotede.g.<header class="title">
You now have two HTML files in your site folder - index.html and tutorial.html.
Find the following code.
<h1>page heading<h1>
Change page heading to tutorial. This is what will show as the main heading. You will now be able to see that these are different pages. You will design and write your tutorial page later - for now, we are just making the structure of the website.
The next step is to link the pages in order to make them into a website.
To find out the meanings of these tags look them up on this HTML5 reference page - MDN HTML elements reference
The <a> tag marks up a link element; the href attribute marks up the destination of a link - which could be another web page on the same site, or a link to an external web page. At the moment the links have no destination. Edit index.html as shown below in the highlighted lines of code -
Save your web page and preview it in a web browser to test the links.
When you preview the page can you see where your page title is shown at the top of the browser window? Web pages should be given titles containing keywords which help search engines to index them and users to find them. Change the page titles to something that reflects the content of the page. The title is defined in the head of the HTML file -
<title>Learning journal</title>
It's a good idea to preview the page you are making frequently, to see how it will look when displayed on the web. Preferably preview it in Firefox, Chrome and Internet Explorer, as the browsers render web pages slightly differently and you need to check that the page displays correctly in all the main browsers.
Follow the same process in Step 2 to make a third page named contact.html. Link this page to the other two in the same way.
Step 4: Add content to the Learning Journal page
index.html is going to be your Learning Journal - part of the assessed coursework. In it you will keep a record of your learning week by week and links to resources that you find that help you learn. The HTML template that you have used to make index.html is marked up with some basic structural elements -
A <header> section with page headings <h1> and sub-headings <h2> <h3>
Primary navigation - links to the Tutorial and Contact me pages - marked up as list items <li> in an unordered list <ul>
The main content of the web page is nested within the <main> element
Content marked up with the <article> tag - use this element to structure your journal posts
A footer section for copyright details <footer>
Experiment by adding some content to these elements. For example, think of a title for the page and write your first journal post.
Created the learning journal home page index.html and linked it to a second page tutorial.html and a third page contact.html through a menu
Edited the page title and added some content to the page
Used <h1>, <h2>, <h3> tags to make headings and sub-headings
By the end of Step 4 you should have made two web pages that are starting to look like this example - CI435 learning journal.
Absolute and relative links
A link joins one web resource to another. There are two types of links that are used in a web page - absolute and relative. Both types of link use the <a> (anchor) tag and an href attribute to specify the destination of the anchor - e.g. the URL of an external website, or another page on the site. Absolute links use the full URL and are used to link to resources which are external to the website. Relative links are internal and are used to point to a file within the website folder, specifying the directory path.
You have used relative links to link index.html and tutorial.html through the menu. If you want to link to some external websites use the full URL of the page that you want to link to -
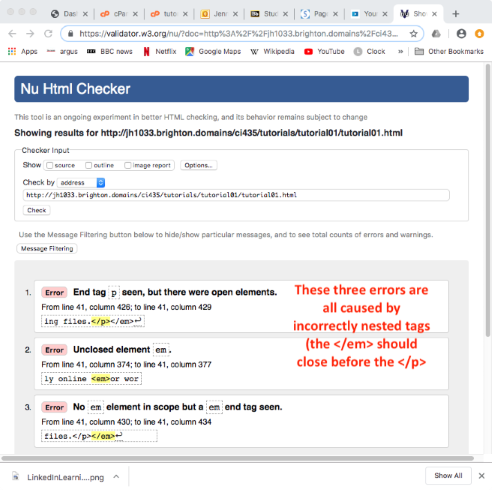
The World Wide Web Consortium (W3C) is the body that works to specify and develop web standards for HTML, CSS etc. It is important to check pages as you work on them to ensure that the code is valid and well-formed. You can do this either by entering the URL of your web pages, or by uploading the file to the validation service.
Try and validate as you go, to avoid having a long list of errors that are hard to debug.
The validation service will check your HTML according to the Doctype specified in the head of the document. In the case of an HTML5 doctype it will check for conformance to HTML5 and will not check for compliance with XHTML Strict syntax rules.
http://YOURUSERNAME.brighton.domains/FOLDERNAME/index.html. Type this URL into a browser to view your site online. Replace YOURUSERNAME and FOLDERNAME with your own details.
Do not panic if the validator tells you that you have a lot of errors. This often happens - for example if you have made a mistake in a line early on in your document it will cause an error in all the subsequent lines of markup. Correct the first error (ask for help if you do not understand what the problem is) then save your page and re-validate it. You will find that a lot of the other errors will disappear with this single correction.
Please don't delete the web pages you have made as you will be doing some more work on them over the next few weeks. If you have not had time to complete the tutorial please carry on and finish it in your own time. If you have any questions email Jennie Harding.